
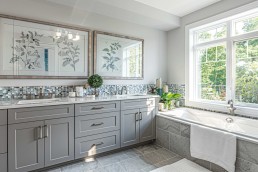
Luxury Bathrooms: Creating a Spa-Like Retreat at Home
After a long, hectic day, we all want to go to a place of peace and relaxation. Would you believe that this peaceful place can be within your very home? By crafting a thoughtful design, you can transform your bathroom into a private spa. Let's see how you can turn this dream into reality.
The Value of a Spa-Like Bathroom
In today's fast-paced world, finding a sanctuary within your own home is a precious luxury. Your bathroom, often overlooked, can be a haven of peace. Beyond being a mere space for personal grooming, your bathroom serves as a sanctuary for both your physical well-being and mental peace. The importance of cultivating a spa-like atmosphere in your bathroom cannot be overstated; it offers a much-needed escape from the tumultuous demands of our daily lives.
Designing Your Luxury Bathroom
When it comes to crafting your spa-like bathroom, a few fundamental principles reign supreme. First, colour schemes set the mood – think soothing palettes of blues and earthy tones. Your bathroom's layout and efficient space utilization matter for a clutter-free oasis. Adequate lighting is crucial, casting a warm, inviting glow. Furthermore, materials such as marble, granite, or top-tier tiles introduce an element of extravagance. Now, let's delve into the intricate details of constructing your ideal bathroom retreat.
Key Components to Consider
-
High-end fixtures and Fittings
When you embark on the journey to create your spa-like bathroom, it's essential to start with the foundation of luxury: high-quality fixtures and fittings. These elements enhance the aesthetic appeal of your bathroom and contribute to its functionality. Let's explore the key components that will elevate your experience.
Begin with your faucets and showerheads. High-quality fixtures not only elevate aesthetics but also ensure durability. These can give you a shower experience that leaves you feeling refreshed and rejuvenated.
Also, consider the focal points of relaxation: bathtubs and showers. They are more than just functional. They're an opportunity to indulge in comfort.
Furthermore, your vanity units and sinks shouldn't be mere utilities but elegant complements to your bathroom's overall design. Quality materials and thoughtful design can transform these everyday items into works of art.
-
Storage and Organization
If there's one formidable enemy that threatens your luxury experience, it's a messy bathroom. Luxury and clutter are incompatible, and getting the best experience out of your bathroom means getting rid of the latter.
The path to a clutter-free bathroom begins with practicality. Implement storage solutions like built-in cabinets, floating shelves, or concealed compartments to maintain a sleek and uncluttered look.
In both design and approach, minimalism can play a role in your journey towards a serene space. The less clutter you have, the more spacious and ordered your bathroom will feel.
-
Smart Technology for Luxury Bathrooms
In today's world, consider how modern technology can elevate your experience to new heights of convenience and sophistication. Technology has become an integral part of our lives, and it may have a place in your bathroom luxury experience.
For starters, smart mirrors can add a futuristic touch, and contribute to the functionality and aesthetics of your bathroom. Another way to elevate your luxury experience is touchless faucets and toilets. Their hygienic benefits, particularly in today's health-conscious world, are undeniable. These fixtures reduce physical contact, ensuring a clean and safe environment. Picture effortlessly turning on the faucet or flushing the toilet without touching a handle.
The integration of technology can enhance the spa-like experience in your bathroom. Adjust lighting and water temperature with a simple touch, creating a personalized and immersive environment that aligns perfectly with your desired level of luxury.
-
Creating a Soothing Atmosphere
The luxury extends beyond the physical. It's also an experience that envelops you in comfort and tranquillity. In your spa-like bathroom, the ambiance is crucial in creating this experience.
With scents and aromatherapy, you can replicate a spa-like ambiance in your bathroom. Consider incorporating fragrances like lavender or eucalyptus through scented candles, essential oils, or diffusers. They are known for their soothing properties.
Your bathroom can also be more than a silent retreat. Imagine soaking in the tub while listening to soothing music or nature's symphony. Soundscapes can transform your bathroom into a haven of relaxation, where every sound contributes to a sense of peace and serenity.
-
Towels, Robes, and Linens
Remember that YOU are also an integral part of the luxury experience. Personal comfort is key to bringing these luxurious experiences together.
This comfort extends to the towels, robes, and linens you choose. High-quality towels and plush robes feel exquisite against your skin and add a touch of luxury to your daily routine. Imagine wrapping yourself in a fluffy robe or drying yourself off with a comfortable towel after an amazing shower.
Even the often-overlooked elements, such as bath mats and shower curtains, deserve attention. Luxury linen options can harmonize with the overall design of your bathroom, enhancing the feeling of comfort and refinement.
Spa-Like Bathroom Projects
Attaining luxury doesn't need to create a hole in your wallet. It's entirely possible to create a spa-like bathroom through massive expenses. By following simple and budget-friendly ideas, such as changing fixtures, adding a fresh coat of paint, or upgrading accessories, we can have a luxurious bathroom over time.
Maintenance and Care
Maintenance is necessary in upholding the luxurious bathroom experience you've painstakingly crafted. It plays a pivotal role in preserving the aesthetics, preventing damage, ensuring functionality, and maintaining safety in your spa-like haven. By addressing issues and conducting regular checks on the different parts of your bathroom, you not only extend the lifespan of your investments but also contribute to your overall well-being. In essence, maintenance is the linchpin that ensures your bathroom remains a long-lasting sanctuary of peace and relaxation.
Your Bathroom, Your Sanctuary
In a world that never stops, your bathroom can become the pause button you've been craving. Transform it into a spa-like retreat, and embrace the art of self-care and relaxation. As we wrap up, remember that your journey to a spa-like bathroom begins with a single step. Start your transformation today and create the haven you deserve. Your oasis awaits!

5 Tips for Creating a Cozy Basement
We all know that a basement is more than just a place to stash old junk and forgotten memories. It's a treasure trove of potential, a hidden gem waiting to be polished. Today, we're unlocking the secrets to creating a basement that's not just any old space, but a cozy haven. After all, who wouldn't want a snug retreat or an extra living area right below their feet? So, stick around, and we'll share five valuable tips to transform your basement into a snug and inviting oasis.
Defining Cozy
First things first, what does cozy even mean? Well, cozy is that warm, comfortable feeling when you wrap yourself in a soft blanket on a chilly evening. It's that snug sensation that seems to make all your problems go away.
So, when we dive into the art of crafting a cozy basement, our mission is to ignite that very sensation. We aim to metamorphose your basement into a sanctuary – a space where you and your cherished ones can kick back, rejuvenate, and escape the relentless whirlwind of daily life.
To attain that desired level of coziness in your basement, it's vital to grasp the elements that come together to create it. It's not merely about throwing in some comfy furniture or adding warm colours. It's a combination of carefully selected elements.
As you delve into these tips, remember that every component is a building block in the construction of your dreamy basement haven. Embrace them all, and you'll soon discover yourself enveloped in the comforting cocoon of coziness each time you step into your basement sanctuary.
-
Choose the Right Color Scheme
Creating a cozy basement begins with selecting the perfect colour scheme. It extends beyond mere aesthetics; it's about crafting the perfect ambiance.
Picture yourself entering your basement, and immediately, it wraps you in a welcoming, cozy embrace. This is the magic of the right colours. Warm and inviting shades can turn your basement into a sanctuary.
Opt for soft, earthy tones such as warm beige, gentle terracotta, or calming sage green for your walls. These colours create a sense of coziness and make your basement feel like a natural extension of your home.
For flooring, consider materials like hardwood, laminate, or vinyl in shades of brown, gray, or deep charcoal. These choices not only look fantastic but also provide a solid foundation for your cozy haven.
-
Adequate Lighting
Now, let's delve into the world of lighting. Lighting, often underestimated, holds the key to coziness. It possesses the remarkable ability to metamorphose your basement from a dim, dreary space into a hospitable haven. Proper lighting is nothing short of crucial when it comes to establishing the perfect atmosphere.
Recessed lighting, for instance, provides even ambient illumination that brightens up the entire space without overwhelming it. Floor lamps are tall and elegant. They add style and soft illumination perfect for creating cozy corners or reading nooks.
Don't forget about wall sconces; these decorative fixtures offer both extra lighting and a cozy, intimate atmosphere. For an extra touch of sophistication, consider the installation of dimmer switches. These clever additions allow you to fine-tune the lighting according to your mood. Whether you're settling in for a cozy movie night or a romantic dinner, dimmer switches bestow complete control over your basement's ambiance.
-
Comfortable Furniture and Layout
Comfortable furniture and a well-thought-out layout are the backbone of a cozy basement. Imagine sinking into a cloud-like sofa after a long day's work – that's the level of comfort you want to achieve.
Start by choosing furniture that's not only stylish but also comfortable. Look for sofas and chairs with plush cushions and ergonomic designs, focusing on softness and support.
Furthermore, opt for pieces that serve a purpose, such as storage ottomans or convertible sofas for accommodating guests. To tie it all together, make sure your furniture complements the overall theme of your basement, whether it's modern, rustic, or eclectic.
Now, onto layout – think about the flow of traffic and how you'll use the space. Create cozy nooks for reading, entertainment areas for movie nights, and a welcoming focal point, like a fireplace or a large coffee table. A well-arranged layout maximizes space and comfort, making your basement the ultimate cozy retreat.
-
Proper Insulation and Temperature Control
Coziness goes hand in hand with the right temperature. No one wants to shiver in a chilly basement or sweat in a stuffy one. So, let's talk about insulation and temperature control.
Proper insulation plays a crucial role in maintaining a cozy temperature year-round. It prevents heat loss during the winter and keeps the temperature stable in the summer. Ensure your basement walls and floors are insulated adequately to create a snug environment.
Now, let's discuss heating solutions. Consider electric fireplaces for a cozy focal point that radiates warmth. Space heaters provide instant comfort and can be placed strategically for maximum effect.
For the ultimate luxury, think about radiant floor heating – there's nothing quite like the toasty feeling beneath your feet. By taking care of insulation and temperature control, you ensure that your basement remains a comfortable and inviting space throughout the seasons.
-
Personalized Decor and Accessories
Lastly, it's time to add your personal touch to your basement. This step is where the coziness comes to life. Personalized decor and accessories transform your basement from just another room into your own snug sanctuary.
Imagine walking in and seeing your story and personality reflected in every corner. Start with cozy accessories like throw blankets, soft cushions, and area rugs. Drape those blankets over sofas and chairs, plump up your cushions and define spaces with the right rug.
It's these little details that make a big difference. Next, incorporate artwork, photos, and personal memorabilia on your walls and shelves. These treasures tell your story and create a warm, inviting ambiance that's uniquely yours.
When your basement is filled with your personality and style, it becomes more than just a room – it becomes your cozy haven, ready to embrace you with open arms whenever you step inside.
Conclusion
In a nutshell, your basement is a goldmine waiting for your touch. It's the space that can become your ultimate retreat or a cozy hangout spot for friends and family. So why wait? Start your basement transformation project today, and before you know it, you'll have a basement that's the epitome of cozy. Enjoy your newfound haven!

5 Must-know Windows and Doors Maintenance Tips for Longevity
Windows and doors: They’re not just entry points to your home. They also play a crucial role in ensuring comfort, security, and energy efficiency. To maintain their functionality, regular maintenance is a must. In this blog post, we’ll explore five fundamental maintenance tips for windows and doors. These tips aim to extend their lifespan and shield you from future expensive repairs. Let’s dive right in!
Why Maintenance Matters
Before we get into the nitty-gritty of maintenance, let’s understand why it’s essential.
Prevents Costly Repairs and Replacements
Neglecting your windows and doors can lead to more significant issues, translating into hefty repair bills or even the need for complete replacement. Regular maintenance acts as a shield against these unwanted expenses.
Enhances Energy Efficiency
Leaky windows and doors can be a major source of energy waste. Maintaining them ensures your home remains cozy while keeping utility bills in check.
Improves Home Security
Secure doors and windows are non-negotiable when it comes to home safety. Regular upkeep ensures your entry points are robust, providing peace of mind for you and your family.
Maintains Curb Appeal and Property Value
A well-maintained exterior speaks volumes about your home. It makes a great first impression and keeps your property’s value intact.
Now that we understand the importance let’s dive into the tips:
Tip 1: Regular Cleaning
Although cleaning your windows and doors may appear to be a mundane task, it serves as the initial defence against wear and tear. The accumulation of dust, dirt, and grime on these surfaces can lead to a lacklustre appearance and hinder their functionality. Clean windows and doors not only enhance their visual appeal but also optimize their performance.
Here are step-by-step cleaning instructions:
-
Gather Your Tools
You’ll need a bucket, mild dish soap or window cleaner, a sponge or soft cloth, a squeegee, and a lint-free cloth.
-
Remove Dust and Debris
Before applying a cleaning solution, use a dry cloth or duster to remove loose dirt and dust.
-
Prepare the Cleaning Solution
Mix a few drops of dish soap or window cleaner with warm water in your bucket.
-
Wash the Surfaces
Dip your sponge or cloth into the soapy water and thoroughly scrub your windows and doors. Be sure to pay attention to the corners and edges.
-
Rinse and Squeegee
Rinse the soap with clean water, then use a squeegee to remove excess water and avoid streaks.
-
Dry and Polish
Finish by drying the surfaces with a lint-free cloth for a sparkling finish.
Recommended Cleaning Products and Tools:
- For windows, use a gentle, streak-free window cleaner.
- For doors, a mild detergent mixed with water or a mixture of vinegar and water works well.
- Microfiber cloths are excellent for streak-free cleaning.
Tip 2: Inspecting for Wear and Tear
Routine inspections are like health check-ups for your windows and doors. They help identify issues early, preventing them from becoming major problems.
How to Spot Common Issues:
- Leaks: Look for water stains or discoloration on walls or sills, which could indicate water infiltration.
- Cracks: Inspect the glass and frames for any visible cracks.
- Rot: For wooden doors and frames, check for soft or discoloured areas, which could be signs of rot.
Emphasize the Need for Immediate Repairs
If you notice any of these issues during your inspections, don’t delay. Address them promptly to prevent further damage and more costly repairs down the line.
Find a Window Replacement Professional
Are you looking to replace your windows?
Tip 3: Lubricating Hinges and Locks
Hinges and locks are the moving parts of your doors and windows, and they need a smooth operation. Lubrication prevents friction, wear, and rust, ensuring they function correctly and last longer.
Types of Suitable Lubricants:
- Silicone-based lubricants are ideal for most windows and doors as they are long-lasting and won’t attract dirt.
- For locks, a graphite or dry-film lubricant is a good choice.
Guide on When and How to Lubricate:
- Lubricate hinges and locks at least once a year or when you notice any squeaking or resistance.
- Apply a modest quantity of lubricant to the movable components and operate them back and forth to ensure even distribution.
Tip 4: Weatherproofing
Weatherproofing seals gaps and cracks, preventing drafts and heat loss. It’s crucial for maintaining a comfortable indoor temperature and reducing energy bills.
Tips on Sealing Gaps and Cracks:
- Inspect for gaps and cracks around window and door frames.
- Use weatherstripping materials like adhesive-backed foam, rubber, or metal strips to seal these gaps effectively.
Types of Weatherstripping Materials Available:
- Adhesive-backed foam tape: Easy to install and effective for sealing small gaps.
- Rubber gaskets: Durable and suitable for larger gaps.
- Metal or vinyl strips: Ideal for doors and windows that open and close frequently.
Tip 5: Repainting and Refinishing
As time passes, the paint or finish on your windows and doors may degrade due to prolonged exposure to the elements. Here’s when it becomes crucial to contemplate repainting or refinishing:
- When you notice chipping, peeling, or fading of the existing paint or finish.
- To protect wooden surfaces from rot or damage.
Importance of Choosing the Right Paint or Finish
Selecting the right paint or finish is essential for longevity and protection from the elements. Choose products specifically formulated for exterior use to withstand weathering.
Benefits of Regular Maintenance:
By following these maintenance tips, you’ll enjoy a range of benefits:
- Cost Savings Over the Long Term: Preventing major issues through regular maintenance saves you money on repairs or replacements.
- Increased Lifespan of Windows and Doors: Your windows and doors will last longer, providing long-term value.
- Energy Efficiency and Reduced Utility Bills: Well-maintained windows and doors keep your home comfortable and energy-efficient.
- Improved Indoor Comfort and Air Quality: A well-sealed and maintained home provides better indoor comfort and air quality.
- Improved Home Aesthetics and Curb Appeal: A tidy, properly maintained exterior elevates your home’s overall appearance and market value.
Conclusion
In summary, tending to your windows and doors goes beyond mere appearances; it’s a wise investment with lasting benefits. Consistent upkeep guarantees their continued excellent condition, leading to financial savings and an overall improvement in your home’s quality. So, don’t wait – start implementing these simple tips today and enjoy the longevity and cost savings they bring to your windows and doors. Your home will thank you for it!

Find a Window Replacement Professional
Are you looking to replace your windows? Discover top-notch window replacement professionals through our extensive contractor network. Answer some questions about your needs and we will match you with qualified window replacement experts!

Inspiring Your Kitchen Redesign with Trending Color Palettes
In this blog, we'll take you on a journey through trending kitchen colour palettes that have the power to transform your space. Discover how to choose the perfect palette based on various factors and personal style. We'll help ensure your kitchen redesign reflects your unique tastes while inspiring creativity and setting the perfect mood for your daily culinary adventures and gatherings. It's time to elevate your kitchen with the magic of colour.
The Psychology of Kitchen Colors
Let's start by understanding the psychology of colours in the kitchen. Each hue has a unique impact on the atmosphere of your cooking space. Warm tones like red and orange can stimulate energy, while cool shades like blue and green create a calming ambiance. However, your personal preferences and lifestyle should also play a crucial role in your colour choice.
Trendy Color Options:
-
Classic White Kitchens
White kitchens have an enduring allure that transcends trends. Their timeless appeal lies in their simplicity and versatility. White creates a sense of space and cleanliness that's hard to match with other colours. It's like a fresh canvas waiting for your personal touch.
On its own, white kitchens are like a breath of fresh air in your home. They have this unique ability to make even the tiniest of kitchens feel more open and less cramped. The colour reflects light beautifully, making the space seem brighter and more inviting.
You can also use it to set the stage for your personal style. Consider adding a touch of warmth with wooden countertops and a subway tile backsplash. Then finish it off with some green plants and colourful dishes, and you've got yourself a classic white kitchen that's both timeless and stylish.
-
The Bold and Vibrant Palette
Now, let's talk about a kitchen bursting with personality: the bold and vibrant palette. This trend is all about infusing your kitchen with energy and life. Imagine walking into a kitchen where the walls have a vibrant shade of teal or mustard yellow. Instantly, you feel the space come alive.
Vibrant colors can be a kitchen's game-changer, making a statement and establishing the room's overall ambiance. Be it a striking red accent wall, a lively blue island, or colorful cabinets, these bold hues inject a palpable sense of excitement into the space.
Take, for instance, a kitchen with bold red cabinets. It's like a fiery burst of energy. Pair it with some metallic accents and dark countertops, and you've got a kitchen that's bold, vibrant, and full of personality.
-
Earthy and Natural Tones
Now, let's explore the calming world of earthy and natural colour palettes. Think of these colours as a warm hug for your kitchen. They create a cozy and inviting atmosphere that makes you want to linger over a cup of coffee or cook a hearty meal.
Earthy tones include warm browns, soft greens, and earthy grays. These colours bring a touch of the outdoors inside, connecting your kitchen to nature. Imagine wooden cabinets, stone countertops, and earthy-colored tiles. It's like stepping into a rustic cottage in the woods.
-
The Versatility of Neutrals
Neutrals are the unsung heroes of kitchen design. They may seem understated, but their versatility is unmatched. Neutrals provide a timeless backdrop that works with various styles. Whether you're into a modern, minimalist look or a more traditional, cozy vibe, neutrals have got you covered.
Imagine a kitchen with creamy beige walls, white cabinets, and light gray countertops. It's a neutral haven that lets you play with different accents and accessories. You can add pops of colour through colourful dishes, vibrant artwork, or even a colourful backsplash.
-
Trending Color Combinations
Now, let's talk about the art of combining colours. Mixing and matching colours can create a harmonious and visually appealing kitchen. Think about it like a beautiful symphony with different instruments playing in perfect harmony.
Popular colour combinations include complementary pairs like blue and orange or contrasting duos like black and white. These combinations add depth and character to your kitchen. Imagine a kitchen with deep navy cabinets paired with brass hardware and white marble countertops. It's a balance of bold and classic that's simply stunning.
Tips for Choosing the Right Color Palette
-
Consider Lighting
Natural light impacts how colours appear. Bright kitchens can handle bolder colours; darker ones benefit from lighter shades. Test under both natural and artificial lighting.
-
Assess Kitchen Size
Lighter colours make small kitchens feel more spacious, while larger kitchens can explore a wider range. Consider bold accents for larger spaces.
-
Reflect Personal Style
Your kitchen should mirror your style. Incorporate colours you love, but start with neutral tones as a base. Then add your favourite colours through decor works.
-
Test and Visualize
Try painting samples in different lighting scenarios and use online tools to visualize. This step helps you see how colours interact with your kitchen's lighting.
-
Seek Inspiration
Find ideas in magazines, websites, or social media. Collect images that resonate with you, especially those from kitchens similar in size and lighting.
-
Sample Materials
If updating countertops or backsplashes, bring samples to ensure colours harmonize with existing elements.
-
Gather Opinions
Get input from trusted friends and family, but remember your kitchen should reflect your preferences and lifestyle.
DIY Kitchen Redesign Projects
For the hands-on enthusiasts, we have a section dedicated to DIY kitchen redesign projects. You'll find ideas on painting cabinets, selecting countertops, and adding eye-catching accents, all on a budget. You can bring your chosen colour palette to life with some creativity and elbow grease.
Professional Kitchen Design Services
If you prefer a hassle-free approach, hiring a professional kitchen designer might be the way to go. We'll explain the benefits of working with experts who can turn your colour palette dreams into a reality. To help you get started, we'll offer tips on finding and collaborating with a skilled kitchen designer.
Conclusion: Have a Colourful Transformation!
In conclusion, your kitchen's colour palette plays a pivotal role in setting the tone for the heart of your home. So, whether you go for any of the colours we mentioned or not, remember your kitchen should reflect your personality and lifestyle. Use the power of colour to inspire your kitchen redesign and create a space you'll love for years. Happy designing!

Storm Roof Damage? Check Out These 5 Repairing Tips
Our roofs are shields that guard our homes against the elements. Yet, they can sometimes falter in the face of relentless storms. Swiftly addressing storm roof damage is more than a repair task. It's also a preventive measure against future issues. In this blog post, we'll delve into practical and straightforward tips for repairing storm-damaged roofs. From initial assessment to tackling minor damages and insurance claims, we've got you covered.
Storm Roof Damage: When Nature Tests Your Roof's Mettle
Roofs, resilient as they are, occasionally succumb to the fury of storms. Despite their robust construction, some storms will expose your roof's vulnerabilities.
Different types of storm roof damage can emerge from these disasters. Shingles can be ripped away by the wind, leaving gaps that welcome water intrusion. Hail can pummel the surface, which creates dents and fractures that compromise its integrity. Heavy rains can overwhelm drainage systems, which leads to leaks that infiltrate your home's sanctuary. Afterwards, these damages might seem daunting, but here's the reassuring truth: they can be repaired.
Yes, while storms might test the limits of your roof, they also present an opportunity for renewal. Think of it as a chance to bolster your home's defences, ensuring it's even more resilient in the face of future storms.
-
Safety First: Assessing the Situation
When it comes to dealing with roof damage, safety should be your top priority. You're not just repairing your roof; you're safeguarding yourself too. As you assess the storm damage, keep these safety considerations in mind.
Begin by conducting your assessment from the ground. Look up at your roof and gauge the extent of the damage. Are there missing shingles? Are there any obvious signs of leaks or cracks? Trust what your eyes are telling you so you can make informed decisions.
Furthermore, be aware that climbing onto a damaged roof can be risky. Not having the right tools and safety gear can lead to unwanted accidents. Loose shingles, fallen debris, and compromised structures can pose hazards that you might not immediately see from below. As such, always exercise caution and avoid venturing onto the roof until it's deemed safe.
-
Temporary Measures: Holding the Fort
When your roof has taken a hit, every second counts. Immediate action can make the difference between a manageable repair and a full-blown disaster. As you await proper repairs, consider these temporary measures to prevent further damage.
Tarps and boards become your trusty allies in this situation. Cover exposed areas with tarps to shield your home from rain and wind. Secure boards over vulnerable spots to prevent additional problems. These quick fixes might not be permanent solutions, but they offer a crucial buffer against the elements until proper repairs are done.
Remember, these temporary measures are more than just stopgaps; they're your first line of defence against leaks that could wreak havoc inside your home. Be proactive and minimize the potential for further damage while you prepare for comprehensive repairs.
-
Calling in the Pros: When Expertise Matters
When the integrity of your roof is compromised, the professionals are your ultimate partners in restoration. Engaging a professional roofing contractor isn't just about repairs. It's also about bringing expert knowledge and experience to the table.
Why is hiring a pro essential? Well, these experts know the ins and outs of roofs like the back of their hands. They'll conduct thorough inspections to unearth hidden damages that might escape an untrained eye. Plus, they come armed with the right tools to execute repairs efficiently and effectively.
Selecting a reputable and experienced roofing company is key to handling repairs properly. Before you hire anyone, always do your part by researching and hearing out referrals. Once you find the right professionals for the job, you're all set for repairs.
-
DIY Patch-Ups: Nipping Minor Damage in the Bud
Not all storm damage demands professional intervention. There are some minor issues that homeowners can tackle themselves. If you're comfortable with a bit of DIY action, here are some steps to follow for addressing minor roof damage.
Start with individual shingles. If you spot any that are loose or missing, it's within your capacity to replace them. Similarly, for small leaks, patching them up is manageable. Gutter issues, like minor clogs, can also be resolved without calling in the cavalry.
However, DIY repairs come with a caveat: safety precautions. Use proper safety equipment when you have them on hand. But if the damage is beyond your capabilities, you should always ask for the right people to do the repairs. Doing it DIY can get the job done, but remember, your safety matters most.
-
The Insurance Angle: Navigating Claims
Storm-related roof damage can lead to more than just repair costs—it could also involve insurance claims. Navigating this process might feel daunting, but with the right approach, you can streamline the journey.
Start by thoroughly documenting the damage. Photographs provide visual evidence of the extent of the destruction. Couple these images with written descriptions, noting down details that might not be evident in pictures alone.
When working with insurance adjusters, honesty and clarity are your allies. Be prepared to answer questions and provide the necessary documentation. Understanding your coverage details is crucial; it helps you advocate for yourself and ensures that you receive the support you're entitled to.
In the end, remember that the insurance process is a collaborative effort. You're working towards restoring your home, and with the right documentation and communication, you can navigate the claims process with confidence
Long-Term Solutions: Guarding Against Future Fury
Storm roof damage is a call to action for long-term solutions. Beyond repairs, it's about fortifying your roof's foundations. Proper ventilation, insulation, and maintenance form a protective triad against future onslaughts. Investing in quality materials and professional installations paves the way for enduring resilience.
Conclusion: A Roof Ready to Weather Any Storm
Your roof, once bruised by storms, can emerge even stronger with the right approach. From quick fixes to professional expertise and insurance navigation, we've covered the spectrum of storm roof damage repairs. Don't let the weather dictate your future—be proactive, repair, and fortify. A roof that weathers storms isn't just a covering—it's your fortress of peace amid nature's turbulence.

Understanding Concrete vs Asphalt Paving Driveways Main Differences
Your driveway is more than just a path; it's the bridge where daily life meets the comfort of your home. Now, the question is: What material do you want to welcome you? Concrete or asphalt? Choosing the right material for this crucial stretch is no trivial matter. Let's dive into the nitty-gritty of these two contenders that frame the path to your abode.
The Concrete and Asphalt Basics
Concrete, the stony foundation, and asphalt, the resilient blacktop, vie for the honour of being your driveway's surface. Concrete, a solid blend of cement, aggregates, and water, forms a sturdy surface. Asphalt, crafted from a mixture of aggregates and bitumen, boasts flexibility and adaptability.
-
Durability and Lifespan
Concrete: Concrete is like a fortress when it comes to strength. Its durability arises from the combination of cement, aggregates, and water, resulting in a solid surface that can endure heavy loads and even the harshest weather conditions. Concrete driveways stand up to the test of time, maintaining their integrity over decades.
Asphalt: Asphalt boasts a different kind of resilience. Its flexibility allows it to adapt to temperature fluctuations, expanding and contracting without cracking. While asphalt can withstand the challenges of varying weather conditions, it generally has a shorter lifespan compared to concrete due to the wear and tear caused by its pliable nature.
-
Installation Process
Concrete: Concrete installation involves a series of steps. It starts with excavation, followed by the creation of a solid base. The concrete mixture is then poured, shaped, and finished. Curing time, during which the concrete hardens, can be a waiting game. And this might lead to inconveniences due to restricted access.
Asphalt: Asphalt installation is comparatively quicker. After the base preparation, the hot asphalt mixture is laid and compacted. While the installation process is faster, proper maintenance is crucial to ensure the longevity of the asphalt driveway.
-
Maintenance and Repairs
Concrete: Concrete driveways generally require less frequent maintenance. However, over time, they might need sealing to prevent cracks, which can occur due to factors like temperature changes and ground movement. Promptly addressing cracks and sealing when needed helps maintain its appearance and integrity.
Asphalt: Asphalt driveways have more regular maintenance needs. Periodic resealing every few years is necessary to protect against the effects of the sun, rain, and other environmental factors. Patching is also common to address minor damage and prevent it from worsening.
-
Aesthetic Appeal
Concrete: Concrete offers a clean and modern appearance, perfect for those who appreciate minimalist aesthetics. Its smooth surface can be enhanced with various finishes and even stamped patterns, allowing homeowners to create a customized look that complements their property's style.
Asphalt: Asphalt, with its dark colour, exudes a classic and sophisticated vibe. It's worth noting that its colour can help hide stains, which can be a practical advantage for areas with high traffic or exposure to vehicles and the elements.
-
Cost Considerations
Concrete: While concrete driveways have a higher upfront cost due to the materials and labour involved, they often pay off in the long run due to their durability and lower maintenance requirements.
Asphalt: Asphalt: Asphalt driveways offer a wallet-friendly option initially, making them appealing to homeowners seeking an economical choice. Yet, it's essential to bear in mind the likelihood of needing more frequent maintenance and repairs as time goes on.
-
Environmental Impact
Concrete: Concrete production has a larger carbon footprint due to the energy-intensive process of cement production. This production process can contribute to its overall environmental impact.
Asphalt: Asphalt has a potential advantage in terms of recycling and reusing. Recycled asphalt can be incorporated into new asphalt mixes, reducing the demand for new raw materials.
-
Climate Considerations
Concrete: Concrete can be susceptible to cracking in cold climates due to freeze-thaw cycles. However, it performs well in warmer climates.
Asphalt: Asphalt's flexibility allows it to better withstand temperature fluctuations, making it suitable for both cold and hot climates.
Factors to Consider When Choosing:
Homeowner's Budget
Your budget serves as the foundation of your decision-making process. Concrete driveways typically come with a higher upfront cost due to the materials involved and the complexity of installation. Conversely, asphalt driveways present an initially more budget-friendly alternative.
Nevertheless, taking the long view is crucial. Despite concrete's higher upfront cost, its durability often translates to fewer repairs and maintenance in the long run. It's vital to assess your current and future financial standing when making your decision.
Climate and Weather Conditions
Where you live plays a pivotal role in the performance of your chosen driveway material. Concrete is known to stand up well against warmer climates, but it can struggle in areas with freezing temperatures. Cold weather can lead to cracking, which might require repairs.
Asphalt, with its flexibility, fares better in cold regions as it can expand and contract with temperature changes. However, in hotter climates, asphalt might soften and become more susceptible to damage. Factor in the typical weather patterns in your region and choose a material that can weather the elements.
Desired Aesthetics and Curb Appeal
Your driveway isn't just a functional space; it's also a visual component of your home's exterior. Concrete driveways are favoured for their clean, modern appearance that complements a range of architectural styles. They can also be stained or stamped to mimic the look of other materials like stone or brick.
Asphalt driveways, with their darker hue, provide a classic and elegant aesthetic, although they might not offer the same design flexibility as concrete. Consider how each material aligns with your home's overall design and the impression you want to make on visitors.
Long-Term Maintenance Commitment
Maintenance is an essential aspect of keeping your driveway in good condition for years to come. Concrete driveways typically require less frequent maintenance, with occasional sealing to prevent cracks and staining. Asphalt driveways, while more flexible, need regular resealing every few years to protect against deterioration and extend their lifespan.
Think about your schedule, lifestyle, and willingness to invest time and effort in maintenance tasks. Be realistic about how hands-on you're willing to be to keep your driveway looking and performing its best.
Crafting Your Path
When the rubber meets the road, the choice between concrete and asphalt becomes clearer. Concrete offers the strength of the ages, while asphalt's adaptability wins hearts. Remember, there's no one-size-fits-all solution. Your driveway, your rules. Choose wisely and ensure your decision caters to your unique circumstances.

How to Pick a Pet-Friendly Flooring
Just like family members, our furry pals bring happiness and companionship to our lives. However, it's no secret that they can also introduce a touch of disorder, particularly when it concerns our floors. This is precisely why making the right flooring choice for your pet-friendly home is of utmost importance. The wrong choice leads to scratches, stains, and headaches. In this guide, we'll break it down for you, flooring by flooring, so everyone stays happy – including your beloved pets.
Consider Your Pet's Needs
Different pets have different habits and quirks. A tiny Chihuahua might not pose the same challenges as a playful Labrador. You should take into account their size, breed, and behaviour. If your cat loves to sharpen her claws or your pup hasn't quite mastered the art of bladder control, choose the flooring that can handle the occasional mishap or enthusiastic scratch.
Evaluate Durability and Scratch Resistance
We get it – pets and floors aren't always the best match. That's why you need flooring that can handle their energy. When you're looking at hardwood floors, pay attention to the Janka hardness rating. It's like a toughness scorecard for wood. And if your pets have a thing for tap-dancing with their claws, you'll want flooring that laughs in the face of scratches.
Aim for Easy Maintenance and Cleaning
Messy moments are a part of pet ownership. Accidents, spills, muddy paws – they're all on the menu. So, opt for flooring that doesn't make cleaning feel like a Herculean task. Stains should be wiped away without leaving a trace. And hey, if you've got a pet Picasso who loves to decorate the floor with their art, consider sealed or waterproof options.
Bear in Mind Noise Reduction
Our four-legged friends can create quite a symphony of sounds. Paws clicking on tile can sound like a drum solo, and the tap-tap of claws on hardwood might just be your new theme song. If that's not your jam, think about flooring materials that can muffle their percussion. Cork and certain carpets might just be the soundproofing heroes you need.
Prioritize Safety and Comfort
Of course, your pet's comfort and safety also matter. So, look for flooring that's not a slip 'n' slide, especially in high-activity areas. Nobody likes a comedic skid across the room. And consider the temperature factor – cold floors can be a real downer for your pet, especially during winter. Aim for flooring that doesn't leave them shivering.
Flooring Types: Pros and Cons
Now, let's explore flooring choices tailored to our furry friends.
-
Hardwood
Pros: The classic beauty of hardwood is undeniable. It exudes warmth and elegance. Plus, it's typically tough and can withstand a certain amount of pet activity.
Cons: However, hardwood can be a bit finicky. It's prone to scratches and can show signs of wear and moisture damage over time.
-
Laminate
Pros: Laminate is like the chameleon of flooring. It can mimic the look of hardwood, stone, or tile at a fraction of the cost. It's also pretty resilient against scratches and stains.
Cons: But, while it's tough, it's not invincible. It might not handle water as well as you'd hope, so you'll want to clean up spills pronto.
-
Vinyl
Pros: Vinyl flooring is the superhero of water resistance. It's like a fortress against spills and accidents. It's also quite affordable and offers a wide range of styles.
Cons: It might not have the same elegance as hardwood or stone. And while it can take a beating, it's not completely scratch-proof.
-
Tile
Pros: Tile flooring is practically indestructible. It laughs in the face of scratches, stains, and moisture. Plus, it can keep your home cool during those sweltering summer days.
Cons: But, here's the thing – it's not exactly the coziest for your pet to lounge on. And the hardness can be tough on their joints if they're older or have arthritis.
-
Natural Stone
Pros: Ah, the grandeur of natural stone! It's a showstopper, bringing nature's artistry into your home. It's durable, especially if you go for something like granite or slate.
Cons: Yet, it's a tad high-maintenance. Some stones can be porous, making them susceptible to stains. Plus, it's not exactly the comfiest for your pet to nap on.
-
Carpet (if applicable)
Pros: Carpet is the ultimate cozy choice. It's soft underfoot and provides a warm, inviting vibe. It can also absorb sound, which is a plus for noise reduction.
Cons: Carpets tend to attract pet hair and are prone to staining. Dealing with accidents can be quite a challenge, and if your pet has a penchant for scratching, you can kiss those flawless carpets goodbye.
Every type of flooring has its unique character, and the key is to discover the one that syncs perfectly with your pet's habits and your personal tastes. There's definitely a choice suited for every pet enthusiast. However, keep in mind that there's no universal solution – the goal is to find the flooring that showcases both your pets and your individual style.
Budget Considerations
Money matters, no doubt about it. So, let's talk dollars and cents about choosing the right flooring. Different flooring types come with their respective price tags and upkeep costs. While it might be tempting to splurge on that top-of-the-line flooring, keep in mind that budget-friendly options are also available that can still handle the pet parade.
Maintenance Tips for Pet-Friendly Flooring
Congratulations, you've picked the perfect pet-friendly flooring! Now, how do you keep it looking pristine? Establish a cleaning routine that's as routine as your pet's mealtime. Tackle accidents pronto to avoid long-term damage. And remember, not all cleaning products are created equal – opt for ones that won't harm your flooring.
Paws and Floors United – Crafting a Pet-Friendly Haven
And that's the scoop! Selecting the ideal flooring for your beloved four-legged pals isn't exactly brain surgery, but it does require some thoughtfulness. By sizing up your pet's requirements, grasping the ups and downs of different flooring options, and taking into account durability, maintenance ease, noise control, safety, and your budget, you're on a surefire path to creating a pet-friendly sanctuary. Transform your abode into a true haven for you and your furry companions – a place where paws and floors live in seamless unity.

5 Kitchen Ideas that you will Love
Step into a world of culinary transformation as we unveil six captivating kitchen renovation projects, each a masterpiece crafted by our esteemed partner contractors. These exquisite transformations blend innovation and artistry to breathe new life into the heart of the home. From contemporary chic to timeless elegance, prepare to be inspired by the seamless fusion of design, functionality, and creativity that define these remarkable culinary spaces. Whether you’re dreaming of a modern chef’s paradise or a cozy farmhouse haven, these projects offer a kaleidoscope of ideas to ignite your imagination and guide you on your own journey to the perfect kitchen renovation.

Presenting the exquisite craftsmanship of Century Builders from Richmond, Texas, this image unveils a modern kitchen adorned with pristine white cabinets and appliances. The granite countertop exudes elegance, harmonizing seamlessly with the cabinetry’s brown leather handles—a touch of sophistication brought to life by Century Builders’ meticulous renovation. Against the backdrop, an oven and stove stand encircled by more of Century Builders’ expertly crafted white cabinetry. Hovering above the stove, an exhaust hood, both functional and aesthetic, diligently prevents smoke from permeating the space. Adjacent, a sink fitted with chrome fixtures beckons, while another side proudly hosts an open drawer, thoughtfully stocked with utensils and kitchen essentials. This well-appointed kitchen stands as a testament to Century Builders’ artistry, providing a haven for crafting delectable meals with convenience and style.

Crafted under the expertise of Euro Tech Portal, a contractor that specializes in kitchen renovations in Burnaby, BC, this image unveils the essence of a modern kitchen transformation. The space is bedecked with white cabinets and countertops that establish an atmosphere of pristine elegance. Soft gray hues grace the walls, perfectly harmonizing with the lustrous expanse of hardwood flooring. A commanding presence against one wall, a built-in refrigerator stands tall, while an opposing sink provides both functionality and aesthetics. Illuminating the culinary stage, an overhead light fixture is strategically placed to provide ample light for both cooking and post-meal tidying. This kitchen metamorphosis stands as a testament to Euro Tech Portal’s prowess, sculpting a space where style harmonizes effortlessly with utility, resulting in a captivating culinary haven.

Executed to perfection by JSC Renovations hailing from Delhi, ON, this captured image unveils a contemporary kitchen masterpiece. The canvas is painted in the elegance of white cabinets and countertops, a testament to meticulous design. Amidst the expanse, a central island emerges, offering a haven of additional storage for culinary essentials ranging from pots and pans to all that embodies a well-equipped kitchen. Completing the ensemble, a collection of stools encircles the island, their inviting white cushions not only adding comfort but also enhancing the visual tableau, creating a harmonious ambiance for culinary creation and home dining. The skillful hands of JSC Renovations have sculpted a space that transcends mere functionality, delivering a symphony of aesthetics and convenience.

Transformed to perfection by the skilled hands of HP Group Inc., a kitchen renovation contractor in Toronto, ON, this captivating space unveils a contemporary kitchen marvel. The canvas is adorned with white cabinets, exuding modern elegance, and contrasted by sleek black stool that amplifies the visual impact. The kitchen is bathed in a multi-dimensional illumination, with the interplay of pot lights, three elegant pendant lights, and the soft glow of under-cabinet lighting, crafting a harmonious ambiance that perfectly complements the space. Along one wall, an array of white cabinets donning black handles takes centre stage, accompanied by drawers designed to accommodate a spectrum of storage needs. Every detail of this kitchen transformation by HP Group Inc has been meticulously orchestrated, ensuring that it provides all essential amenities for culinary endeavors or entertaining guests with an air of sophistication.

Meticulously rejuvenated by Chattanooga Granite & Marble, this captivating space unveils a old world style kitchen adorned with classic cabinetry and graced by inviting brown countertops. A gentle glow emanates from pendant lights, its yellow shade infusing the room with warmth as it hangs elegantly from the ceiling. Anchoring the space, a marble-crafted island takes center stage, crowned by a bowl brimming with culinary delights. Stainless steel appliances, including an oven and microwave, find their place along one side, while a wall adorned with ornate tiles in shades of blue and green paints a decorative backdrop on another. Above the stove, an exhaust hood emerges, ensuring effective ventilation. Every detail of this transformation by Chattanooga Granite & Marble has been thoughtfully orchestrated, resulting in a kitchen scene that marries both aesthetics and functionality with seamless finesse.
Breaking Down A Full & Partial Bathroom Renovation
When embarking on the journey of revamping a bathroom, homeowners often find themselves confronted with the age-old dilemma: should they opt for a full overhaul or settle for a partial upgrade? It’s a decision that can leave even the most seasoned renovators scratching their heads. But fear not! We’re here to demystify the full versus partial bathroom renovation debate. Are you ready to delve into the intricacies and nuances that distinguish these two approaches? Let’s roll up our sleeves and explore the myriad factors that come into play when making this pivotal decision. By the end of our discussion, you’ll be armed with the insights and knowledge needed to chart the course for your bathroom renovation project with confidence and clarity.
Defining Full and Partial Bathroom Renovations
Before delving deeper, let’s first describe the difference between a full and partial bathroom renovation.
A full bathroom renovation entails stripping the space to its bare bones and reconstructing it from the ground up. Think of it as giving your bathroom an entire rebirth—a new layout, fresh fixtures, tiles, and even revamped plumbing and wiring. It’s a grand transformation waiting to unfold, promising a complete revitalization of your space and potentially addressing any structural or functional issues that may have plagued the old design.
On the flip side, a partial renovation targets specific components of your bathroom without tearing everything apart. This process might involve swapping out the bathtub or shower, updating the vanity, sprucing up the tiles, or even doing a simple wall paint job. It’s like a stylish makeover without the need for a complete metamorphosis. Partial renovations are ideal for those looking to refresh their bathroom’s appearance or functionality without committing to a full-scale overhaul, offering flexibility in budget and scope while still achieving significant improvements in aesthetics and usability.

Find a Home Improvement Professional
Are you looking to do a home renovation and need quotes?
The Personal Touch
Let’s keep it real—there’s no universal answer. Your situation is uniquely yours. So, along with these factors, sprinkle in a pinch of personal preference. Are you seeking a fresh vibe or aiming for a dash of refinement? Balancing your dream, budget, and practicality is the name of the game.
Consider the atmosphere you want to create—whether it’s a serene spa-like retreat or a sleek, modern oasis. Factor in your lifestyle and daily routines. Do you need more storage space, or perhaps a larger shower area? Think about how your bathroom renovation will enhance your day-to-day life.
Ultimately, the decision rests with you. Whether you’re inclined towards a complete renaissance or a stylish tweak, the bathroom transformation journey is yours to navigate. So, which way are you leaning? The path you choose leads to a bathroom that mirrors your tastes and aspirations.
Ready to Transform Your Bathroom? Let the Experts Guide You!
Embarking on a bathroom renovation journey can be both thrilling and daunting. To ensure your vision materializes seamlessly, it’s time to enlist the expertise of bathroom renovation contractors. These professionals possess the skills and know-how to translate your ideas into reality while adeptly navigating the intricacies of the renovation process. With their wealth of experience and keen eye for detail, they’re equipped to handle everything from full-scale transformations to partial upgrades. Finding the right contractor can truly make all the difference in bringing your dream bathroom to life.
Find a Home Improvement Professional
Are you looking to do a home renovation project? Discover the best home improvement professionals through our extensive contractor network. Answer some questions about your needs and we will match you with qualified home improvement experts!
How Proper Insulation in Windows & Doors Keeps You Comfortable in Summer
Welcome to the world of home comfort optimization! Think of insulation as your home’s loyal sidekick, ensuring the perfect indoor temperature all year round. Today, we’ll delve into the incredible benefits of well-insulated windows and doors, especially when the scorching summer heat is in full swing.
What makes windows and doors well-insulated?
Well-insulated windows and doors owe their effectiveness to a combination of factors. They are constructed using advanced materials like double or triple glazing. Those materials consist of multiple layers of glass with insulating space in between. These materials are chosen for their excellent thermal properties. Energy efficiency features, such as low-emissivity (low-E) coatings, are often applied to the glass to further enhance insulation. Proper sealing and weatherstripping prevent drafts and air leakage.
Additionally, well-designed frames from materials with good insulating properties, like vinyl or fibreglass, contribute to overall insulation performance. The synergy of these elements creates a barrier that resists heat transfer, maintains indoor comfort, and helps regulate humidity and noise, making well-insulated windows and doors a vital component of a comfortable and energy-efficient home.
Here’s what they’re capable of:
Reduced Heat Transfer
Imagine this: the sun is relentless, sending waves of heat your way. Inside, however, you’re cool and comfortable. And it’s all thanks to your trusty well-insulated windows and doors. It’s like having a shield against the summer’s fiery onslaught. Now, how does this magic work? Well, it’s a bit of science combined with smart engineering.
You see, insulated windows and doors are made of advanced materials that act like heat-resistant warriors. These materials repel external heat, preventing it from sneaking into your home. But that’s not all—they also hold in the cool air your air conditioning system works so hard to provide. It’s a dynamic duo that keeps you cozy and your indoor climate in perfect harmony, regardless of how intense it gets outside.
Blocking UV Rays
Insulation, my friend, is no one-trick pony. Yes, it’s your go-to for keeping indoor temperatures just right, but it doesn’t stop there. Imagine insulation as your personal bodyguard, safeguarding not just your comfort but also your valuable possessions.
Do you know those sneaky UV rays from the sun? The ones that you can’t see but are notorious for causing colour fading, fabric deterioration, and furniture wear and tear? Well, your insulated windows and doors are equipped with a special power: UV-blocking capabilities. Think of it as a force field that stands between your interior treasures and those damaging rays. So, while you enjoy the pleasant temperature indoors, your furnishings are also safe and sound from the sun’s silent assaults. It’s like having a loyal guardian for both your comfort and your cherished belongings.
Regulating Humidity
Let’s address that all-too-familiar sticky feeling that tends to cling to us during sweltering summer days. With effective insulation in play, bidding adieu to that discomfort becomes a reality. Insulation doesn’t just excel at temperature control—it’s a master of maintaining the perfect humidity level too.
Imagine insulation as a skilled guardian that not only seals out the heat but also locks moisture where it belongs. By closing up gaps that could otherwise allow sneaky moisture to creep in or escape, insulation creates an indoor environment that’s refreshingly dry and comfortable, even when the outside world is dripping with humidity. So, gone are the days of wrestling with that clammy sensation. With insulation on your side, you’ll be relishing a cool, dry haven that shields you from the stickiness of summer.
Find a Window Replacement Professional
Are you looking to replace your windows?
Noise Reduction
How about we turn our homes into a place where the hustle and bustle of the outside world seems like a distant memory? This is the magic of insulation. While insulation is celebrated for its prowess in managing temperature and humidity, it’s also capable when it comes to silencing noise.
Think of premium insulation as your noise-cancelling headphones for your house. Those insulated windows and doors are like the guardians of peace. They’re built to expertly absorb and dampen down the intrusive sounds from the outside. With these soundproofing heroes in place, you’re free to create your own symphony of calmness within your living space. The chaos of the world outside remains exactly where it belongs—outside—while you bask in the peaceful oasis that insulation has woven around you.
Energy Savings
Now, let’s dive into the realm of practicality: your finances and the environment. When your home is properly insulated, it’s like having a financial advisor who’s exceptionally good at their job. How? By boosting your home’s energy efficiency.
Think of your air conditioning system as a hardworking employee. But during summer, it can get a bit overwhelmed when excess heat barges in through poorly insulated windows and doors. This is where insulation steps in to ease the burden. By preventing that extra heat from infiltrating, it reduces the workload on your cooling system. The result? Less energy is consumed, and that translates into real savings on your utility bills. Your wallet will be smiling, and in the grand scheme of things, you’re also helping the environment by reducing energy demand. It’s a win-win scenario that shows how insulation not only enhances comfort but also benefits your financial bottom line and the planet we all call home.
Takeaway: Enhanced Comfort
In a nutshell, think of well-insulated windows, doors, and curtains as your all-in-one package for a luxurious summer experience. No more temperature fluctuations or unwelcome drafts. With insulation on your side, your living space becomes a serene sanctuary where comfort reigns supreme.
Conclusion:
As you sip your iced lemonade and feel the soothing indoor breeze during the sweltering summer, remember that proper insulation is the unsung hero behind your comfort oasis. Your home gets a revitalizing makeover, offering not only unparalleled comfort but also protection and energy savings. So, why not treat your space to the gift of insulation? Transform your home into the cool, calm, and collected haven you deserve, even when the sun is at its fiercest. Your future self will thank you for investing in the comfort of today.
Find a Window Replacement Professional
Are you looking to replace your windows? Discover top-notch window replacement professionals through our extensive contractor network. Answer some questions about your needs and we will match you with qualified window replacement experts!